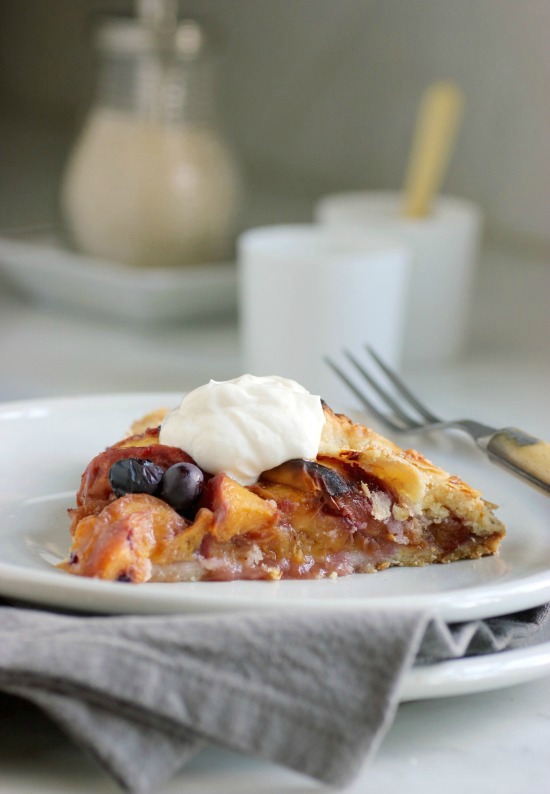
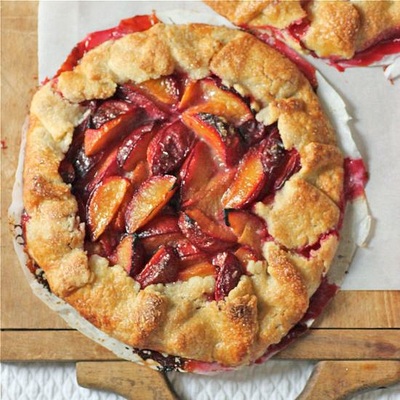
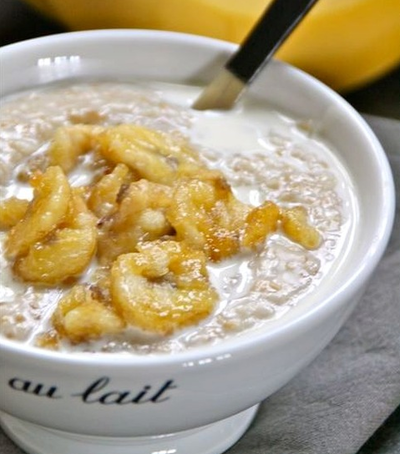
 My kitchen is finally in a stone fruit frenzy. It started slowly for me this summer, but I am now baking something practically every day with plums, nectarines, cherries, or peaches. I made this Peach Galette yesterday when we invited friends at the last minute for dinner. Our weather the past few days in the Twin Cities has been more than spectacular... blue skies with comfortable temps and low dew points. Perfect. And with baskets and bowls of garden produce everywhere in my kitchen, alfresco meals with friends and family need to be enjoyed as often as possible. Soon enough, it will be over... 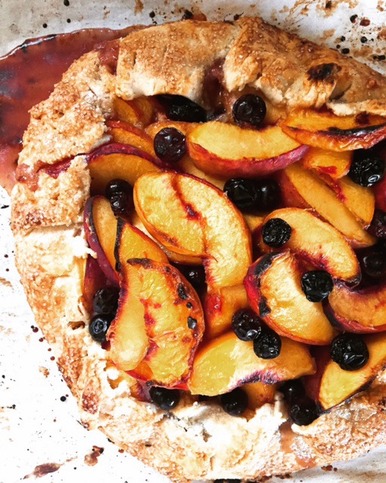 This galette is a variation of one I posted several years ago and it has been my favorite so far this summer. I am considering making it again this week for a dinner-on-the-patio I've been invited to attend. And happily... this galette was dessert one night, breakfast the next morning! Just the way we like it. • Although ice cream or whipped cream would be good along side this galette, I highly recommend serving it with sweetened sour cream. If you do that, this dessert will be pretty perfect.  • Tart dough (recipe HERE) • 4 tablespoons ground almonds (or use almond flour) • 2 tablespoons organic cane sugar • 2 pounds ripe but firm peaches, pitted and sliced into 1/2-inch wedges • 1/4 cup brown sugar • 1/2 teaspoon pure vanilla extract • 2 tablespoons arrowroot powder • 1 egg, lightly beaten • Handful of fresh blueberries • 1/4 cup turbinado sugar for sprinkling • 1 cup (full fat) sour cream • 2 tablespoons organic cane sugar 1. In a medium bowl, gently combine the peach wedges, brown sugar, vanilla, and arrowroot powder. 2. On a sheet of lightly-floured parchment paper, roll the tart dough into a large round. Using a sharp knife, trim the edges slightly to make a perfect round; reserve any trimmings. Carefully slide the parchment sheet with dough onto a large sheet pan. In a small bowl, combine the ground almonds and cane sugar; sprinkle evenly over the rolled tart dough, leaving a 2-inch border. 3. Mound the peaches onto the center of the dough, leaving, again, a 2-inch border. Using a thin metal spatula, carefully lift the 2-inch border of dough over the peaches, pleating the dough as you go around. If the dough has warmed at this point and is becoming difficult to work with, refrigerate briefly. If necessary, use trimmings to patch any little cracks or holes in the pleated dough to reduce leakage of juices. Take the blueberries and scatter them in between peach slices. Brush the dough with the beaten egg and sprinkle the turbinado sugar liberally over the egg wash. 4. Refrigerate the galette for 30 minutes and preheat oven to 425˚F. 5. Transfer the galette to middle rack of oven and bake for approximately 45 minutes, or until the crust is a golden brown. Let the galette rest for 15 minutes before slicing. Combine the sour cream and sugar. Serve with slices of the peach galette. ENJOY! TAKE a LOOK:
1 Comment
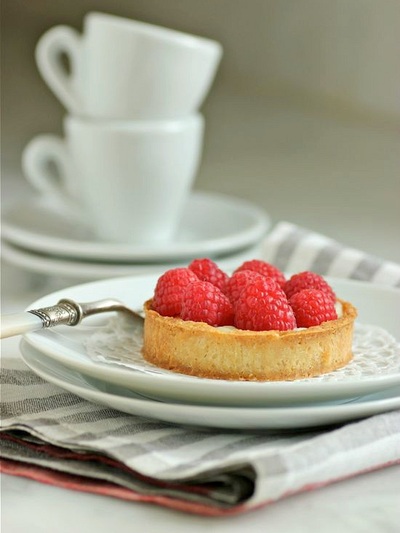
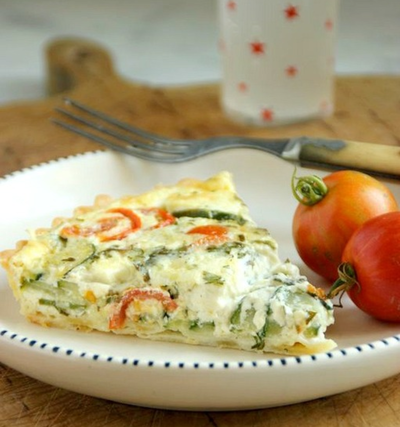
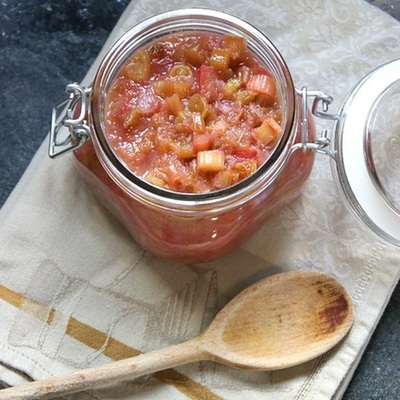
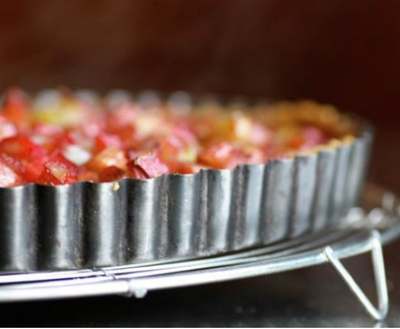
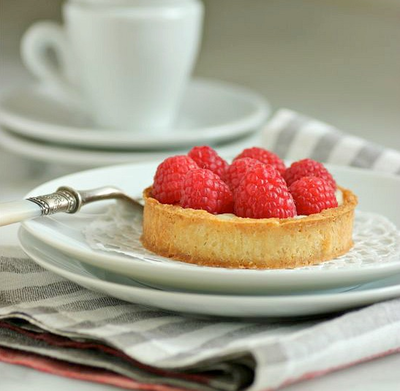
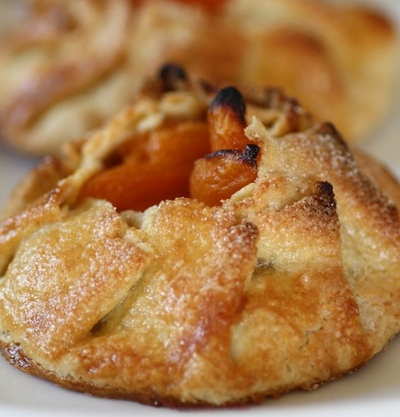
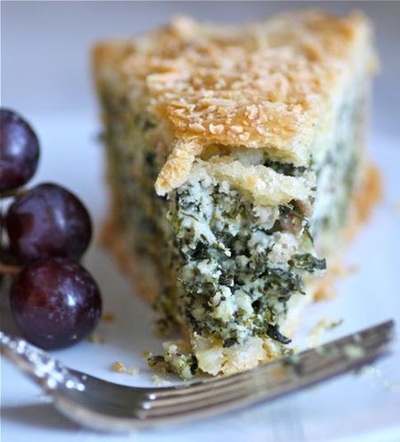
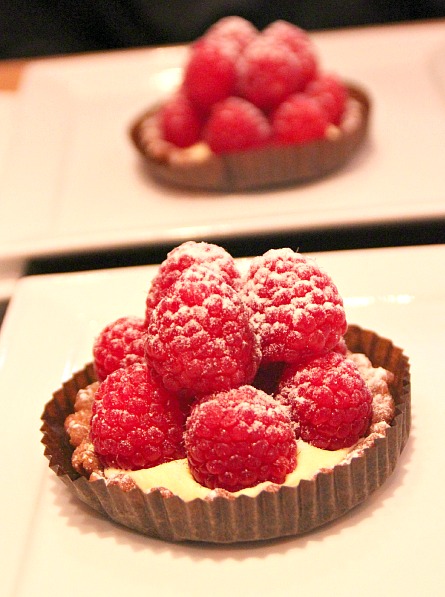
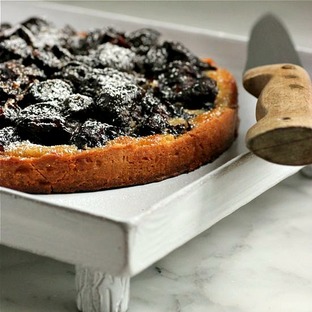
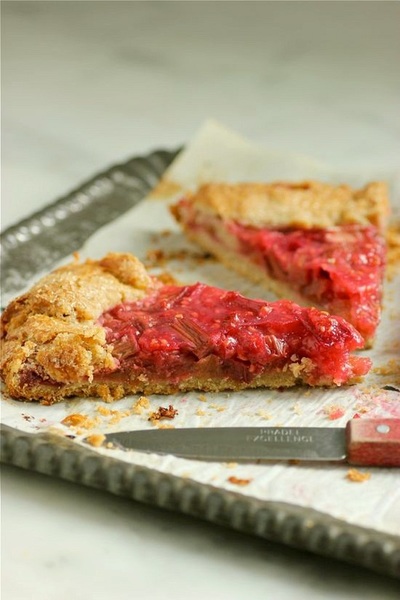
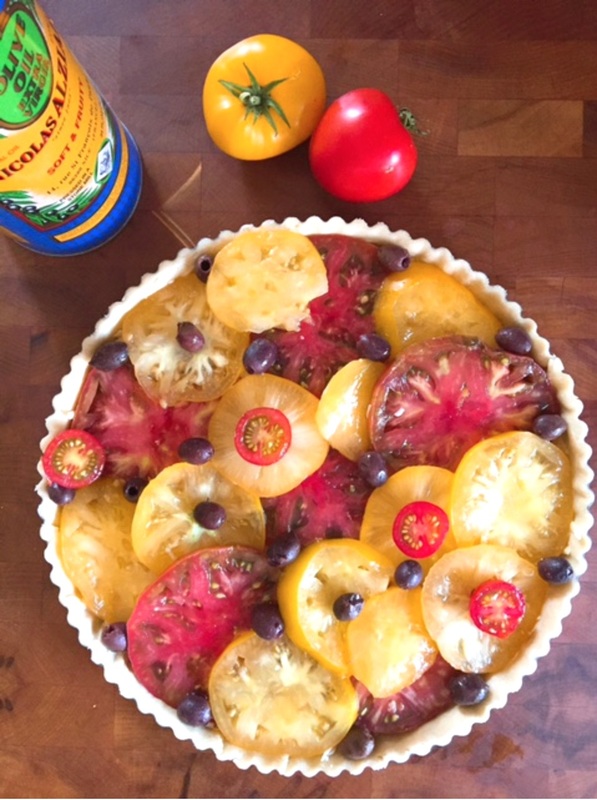 Yesterday I finally had enough tomatoes to make my first French Tomato Tart (recipe HERE) of the summer. Shown above ready for the oven, I could eat this tart everyday through the end of tomato season. Really, I could. This is the earliest I ever remember my heirloom tomatoes ripening. Some past years I have waited until August for my first Purple Cherokee. The plants are loaded and the tomatoes are BIG! All week I've been baking cakes to take to Iowa this weekend for my father-in-law's 90th birthday. The cakes will be assembled Sunday, the day of the party. If they're as good as I'm expecting them to be, I'll let you know and share the recipe ;-) And just in case you're anxious to see a recent photo of Bisous...  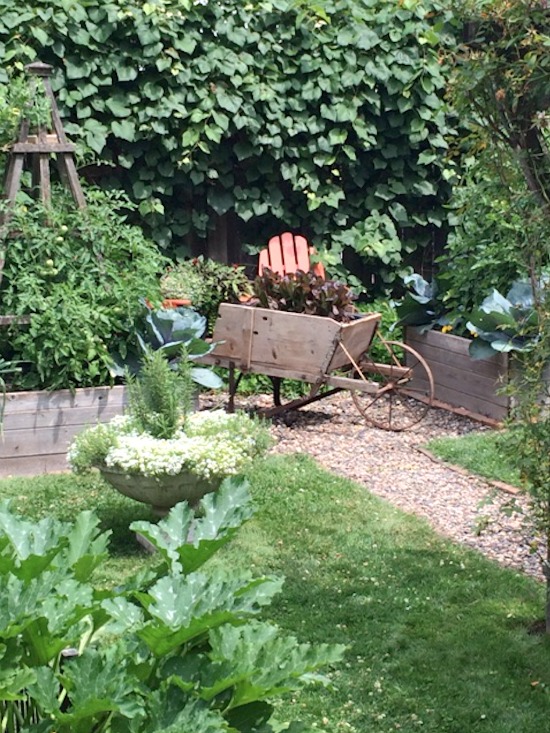 It's mid-July. My garden, my French Bulldog, and my family have been keeping me busy. What's ready in the garden?... beans, zucchini, beets, cucumbers, eggplant and jalapeños. And, of course, all of my herbs. My first Early Girl tomato (that and my Sweet 100 Cherry Tomatoes are the only hybrid tomatoes I grow) will be ready for picking tomorrow; that is, unless a squirrel gets to it before I do. Lettuces, except for the potted ones in the wheelbarrow above, have been pulled due to bitterness. My peas are also done for. Too many 90 degree days this summer. Today I'm dealing with 3 pounds of zucchini. Some of it has gone into baking Chocolate-Zucchini Bread; a nice little treat with our cappuccinos tomorrow morning. The rest, most likely, will be pan fried in olive oil and finished with Parmigiano-Reggiano... a favorite of mine, or possibly stuffed. There will be many more to pick in the next few days. Three zucchini plants give me an endless supply. 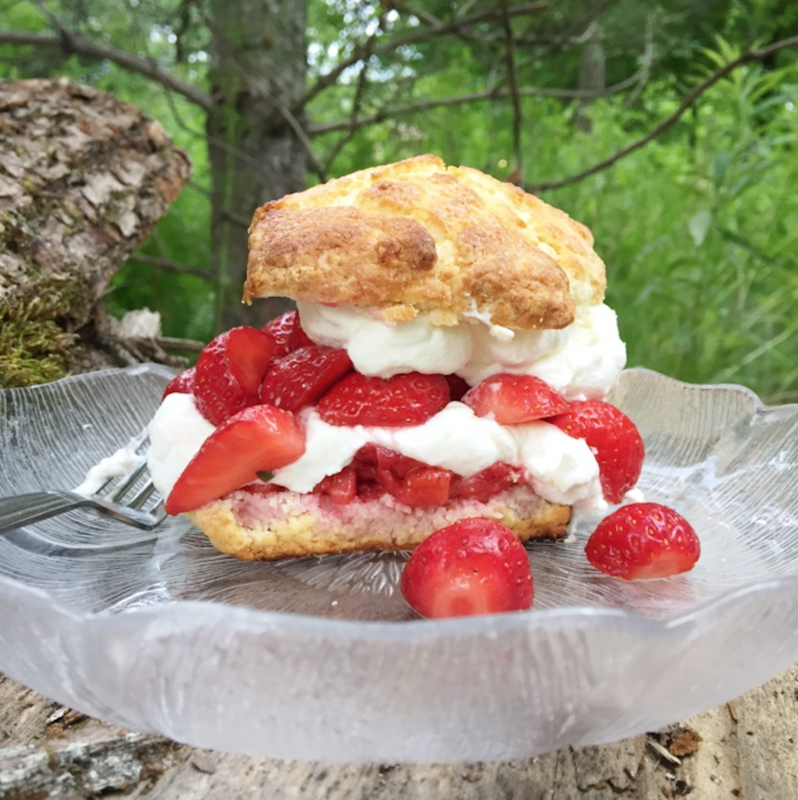 We took our annual July trip "up north" last week, where my husband, daughter and her boyfriend picked 20 pounds of strawberries! And, as usual, I made fresh Strawberry Shortcake for dessert one night. Is there anything better? (my favorite recipe HERE) The remaining strawberries were brought home and frozen, used in spinach and strawberry salads, and made into freezer strawberry jam. 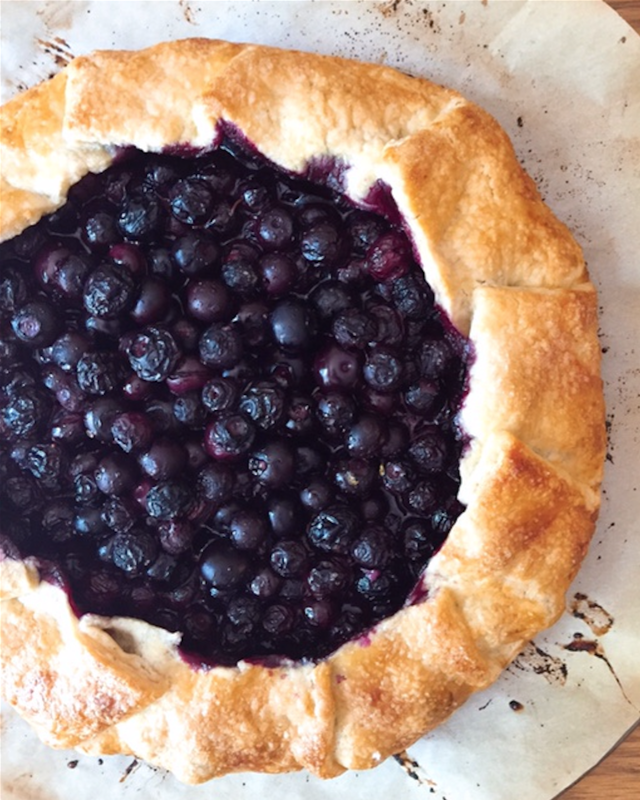 I also made a Blueberry Galette during our stay in the north woods. When I'm up there and making tart crusts (or shortcake), butter is cut into the flour with dinner knives and dough is rolled with a wine bottle. A rustic galette is the perfect dessert when you have limited resources. I served the finished Blueberry Galette with whipped cream, but had I been at home, I probably would have mixed up Vanilla Ice Milk to serve alongside the blueberry wedges. + BLUEBERRY GALETTE • Pastry dough... your favorite, or my recipe HERE • 4 cups fresh blueberries • 1/3 cup sugar, plus additional for sprinkling • Grated zest of one large lemon • 1 egg, whisked 1. Preheat oven to 400˚F 2. On a large sheet of lightly-floured parchment paper, roll the dough into a round approximately 13-inches in diameter. Slide the parchment and pastry dough onto a baking sheet. Chill in refrigerator if the dough becomes too warm. 3. In a bowl, combine the sugar and the lemon zest. Add the blueberries. Using a thin rubber spatula, gently combine until the sugar/lemon zest is evenly distributed. 4. Scoop the sugared blueberries onto the center of the rolled pastry leaving a 2-inch border. Gently lift the pastry border and begin pleating the dough over and around the blueberries. Using a pastry brush, glaze the top of the dough and underneath the pleats of dough with the beaten egg. Brushing egg underneath the pleats will keep them from sliding during baking. Sprinkle the top of the dough with additional sugar. If you have Turbinado sugar, use that. 5. Place the baking sheet on middle rack of oven and bake for approximately 35 - 40 minutes, or until the the crust is golden.  Bisous will be turning 8 months on Saturday and weighed in yesterday at 24 pounds. I have no idea what I should even expect his full-grown weight to be. I am thinking he has now reached his height and his length and will begin to increase his width and head size... but what do I know?? Frenchies grow for 18 months. Also... to all of you who are trying to access recipes from Living Tastefully on your cellphones, I apologize. I never go that route, but I have been told that it's impossible to pull up recipes on a phone. Last year I changed my URL from livingtastefully.weebly.com to livingtastefully.com, and that is what created the problem with cellphone access. It's a multi-step process to change the URLs. I'm working on it, but it is slow going. There are hundreds of recipes ;-( I have also been asked recently why I am not posting as often onto LivingTastefully's Passions to Pastry. Life is keeping me busy, but I am posting many photos on Instagram. I'm really having fun with it. Most of the photos are taken with my iPhone and I've met some wonderful, creative people. If you're interested in checking me out on Instagram, click HERE. TAKE a LOOK:  It's been a glorious summer so far. There have been few days when it is so hot, I question whether I should be in my kitchen baking. That's not the case at all this year. I've been able to bake like crazy. The dew point, much of the time, would even allow meringues! My kitchen has produced many sweet and savory tarts, and one of my favorite has been this Pea and Salmon Tart that made use of freshly picked peas from my garden. For me, there is just nothing better than walking out back and picking dinner. 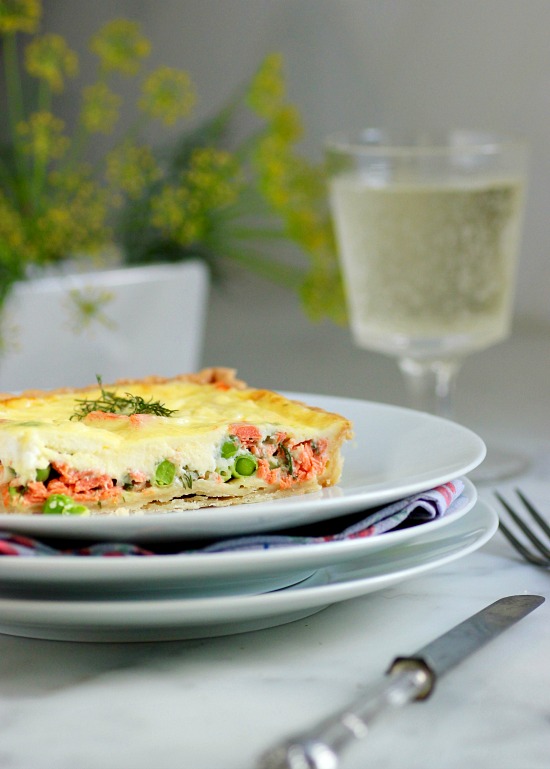 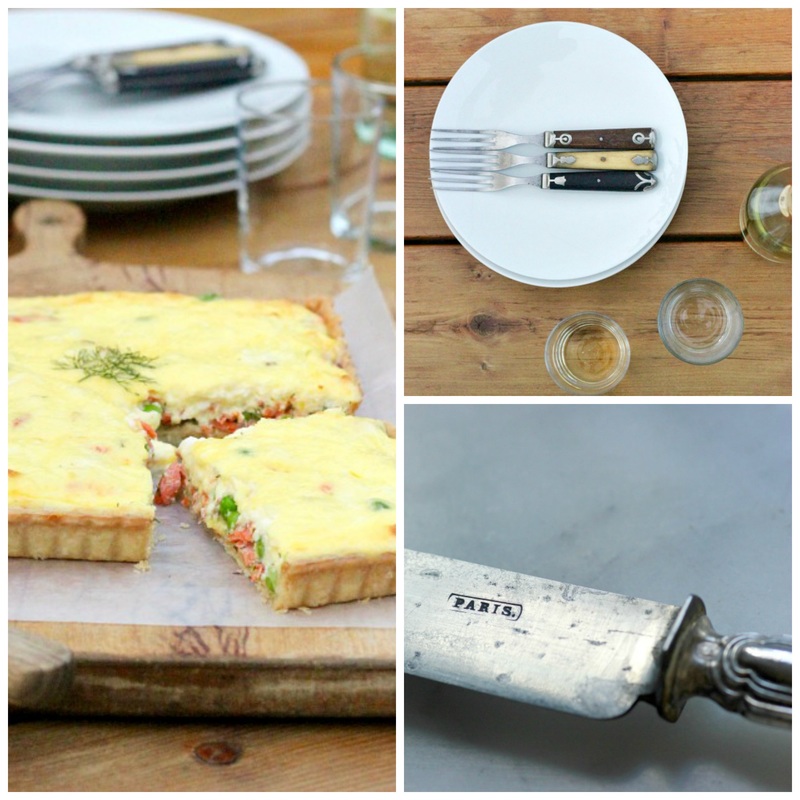 We have been eating every evening meal alfresco. Until a couple of nights ago, we weren't even bothered by Minnesota mosquitoes. Ideal conditions! 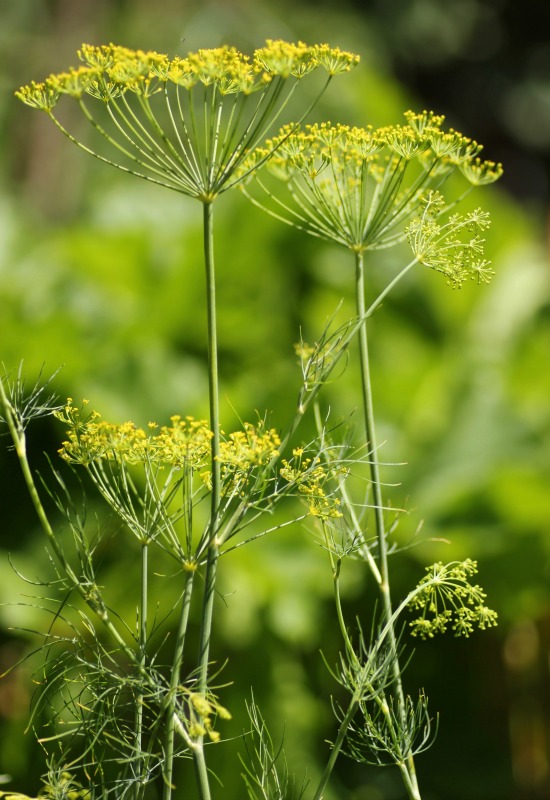 Fresh dill from my herb garden, above. Hydrangea, below, also from my backyard gardens.  This is the first time in many years that we have been home in Saint Paul over the 4th of July holiday. As my husband knows, I really dislike going anywhere during the summer months. I wait all winter... long Minnesota winters... for my kitchen garden. And to leave just when the haricot verts are ready to pick turns me into quite the curmudgeon. 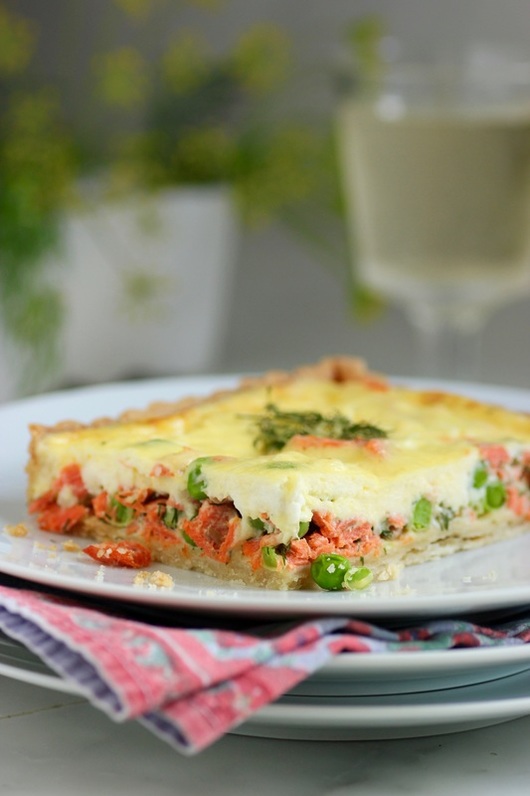  PASTRY • 1 1/2 cups unbleached, all-purpose flour • 1/2 teaspoon kosher salt • 8 tablespoons cold, unsalted butter, cut into 1/2-inch cubes • 4 tablespoons ice water • extra flour for rolling pastry FILLING • 1/2 cup fresh garden peas • 1 poached, baked, or grilled wild salmon fillet, skin removed, and cut into pieces • grated zest of 1 lemon • 2 tablespoons chopped fresh dill • 1 tablespoon finely chopped shallot • 4 large eggs • 1 cup fresh ricotta • 1/4 cup heavy cream • 1/4 cup freshly grated Parmesan • Salt and freshly ground black pepper 1. Pulse 1 1/2 cups unbleached, all-purpose flour and salt in a food processor. Add butter; pulse until pea-size lumps form. Drizzle 3 tablespoons ice water over the mixture. Pulse until moist clumps form, adding more ice water by drips if dry. Gather dough into a ball and flatten into a disk. Wrap in plastic; chill 2 hours or overnight. 2. Roll out dough on a lightly floured surface. Transfer to a round or square tart pan (I used a 10-inch-by-10-inch pan); gently press onto bottom and up sides of the tart pan. Wrap in plastic and freeze while preheating oven to 400˚F. 3. Line dough with foil; fill with dried beans or pie weights. Bake for 17 minutes. Remove foil and beans. Return to oven and bake until crust is golden. Remove crust and reduce oven temperature to 375˚F. 4. In a medium bowl, gently mix together the peas, salmon, lemon zest, dill and shallot. Transfer the mixture to the tart crust and distribute evenly over the crust. In another bowl, whisk the eggs to break up. Add the fresh ricotta, heavy cream, Parmesan and salt and pepper to taste; whisk to combine. Pour evenly over the peas and salmon. 5. Place the tart on the middle rack of the oven and bake until set, about 25 minutes. Serve warm. TAKE a LOOK: 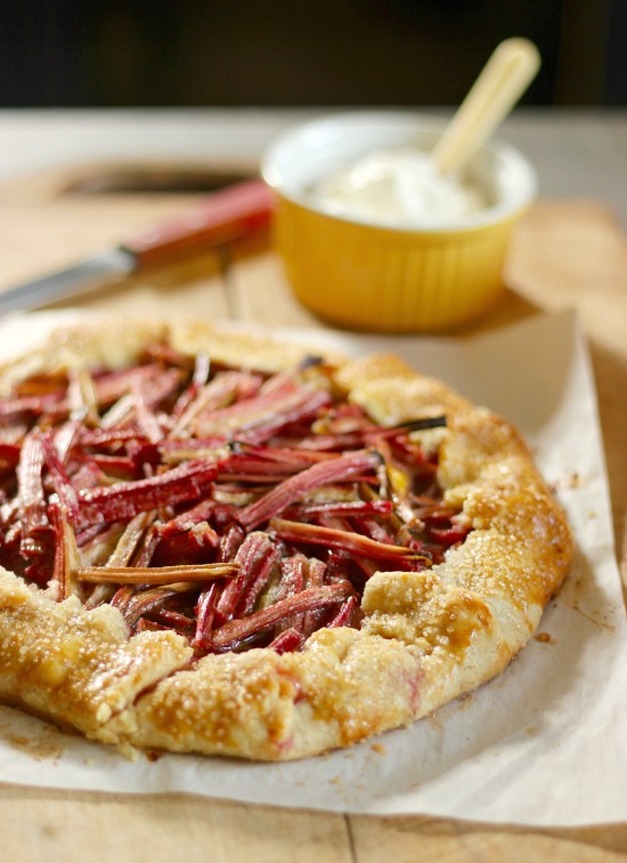 It's a good thing everyone in my family loves rhubarb because lately, it seems that is all that has been coming out of my kitchen. It might be time to change LivingTastefully to The Rhubarb Blog (?)... at least during the spring months. I am very happy to pass this recipe for Rhubarb Galette onto you. For me, galettes have such a wonderful rustic appeal and they are easy to assemble. With a galette, you avoid lining a tart tin with pastry, then lining that with foil and dried beans or rice for a pre-bake (commonly done before filling the shell with custard... or, pastry cream). With a galette, most likely just fruit, mound everything into the center, fold and pleat the edges of the dough, and bake. Easy! There's nothing wrong with syrupy juices bleeding from the crust while baking. In fact, it's somewhat expected. 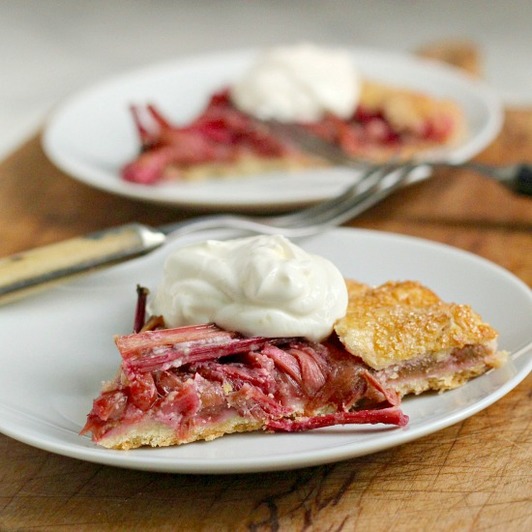 One of my favorite toppings for a fruit galette or tart is organic sour cream with some cane sugar mixed it; tangy and very similar to crème fraîche. Again, easy and so good! 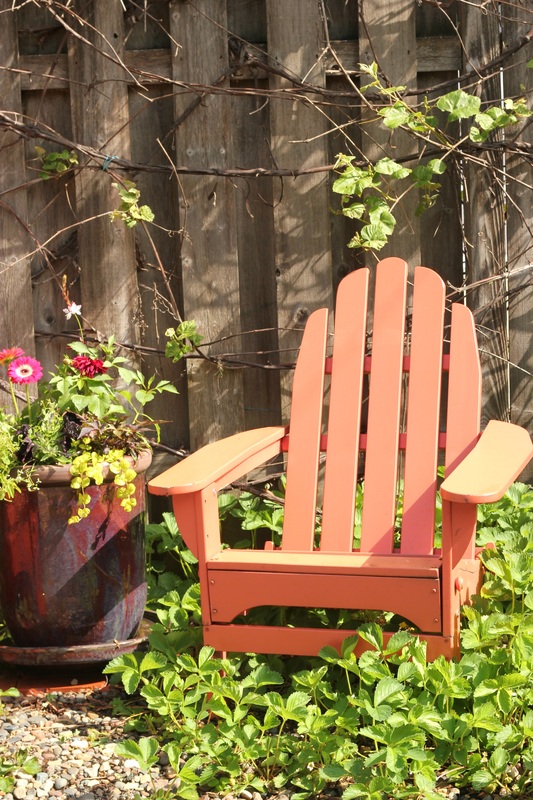 I also thought you might enjoy some early photos of the garden. Most of it has been planted. All of the tomatoes, as of today, are in; something I usually don't do until Memorial Day weekend. But long range forecasts look warm and with rain on the way this week, it will be perfect conditions for the vegetables and herbs. The strawberries surrounding the Adirondack chairs are going crazy! Finally!  This is a photo of my west garden beds. The east side is a mirror image. The chives that we grow were in my mother's garden in Amana, Iowa, where I grew up. I just passed some onto my daughter and her husband for their first garden. In the front raised bed with the newly constructed tuteur, French breakfast radishes edge the outside and nasturtiums will eventually be climbing the frame. 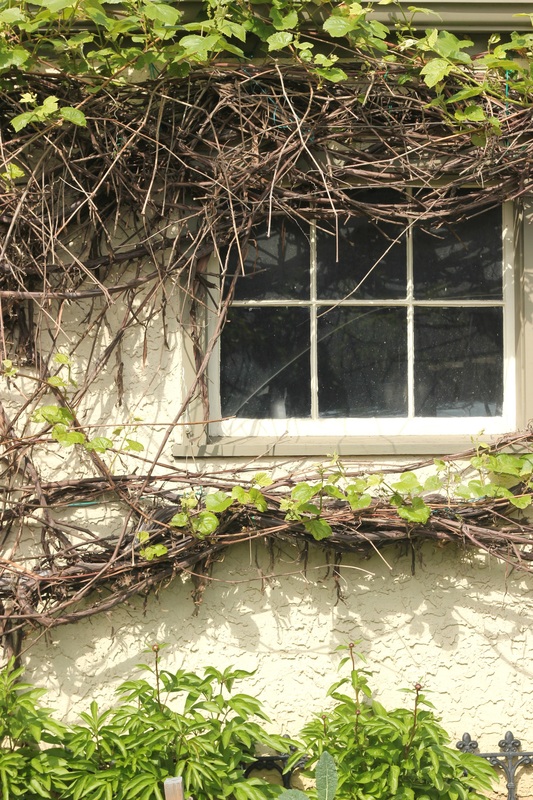 Our University of Minnesota Edelweiss Grapes, along the side of our garage. They also run the length of the backyard fence.  Climbing English peas, purple beans, red onions and French lettuce in the east bed. 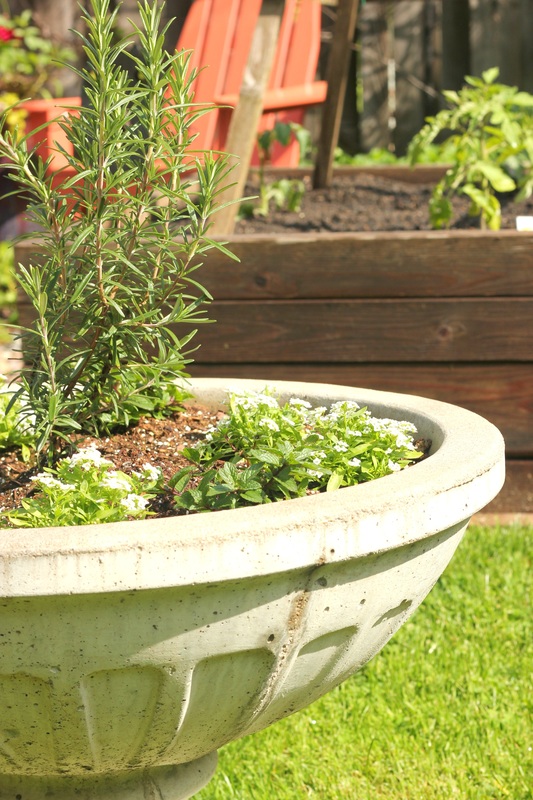 I have two large urns with rosemary in the center and alyssum alternating with either English thyme or mint around the edges. This is the mint, or mojito urn, as I call it. 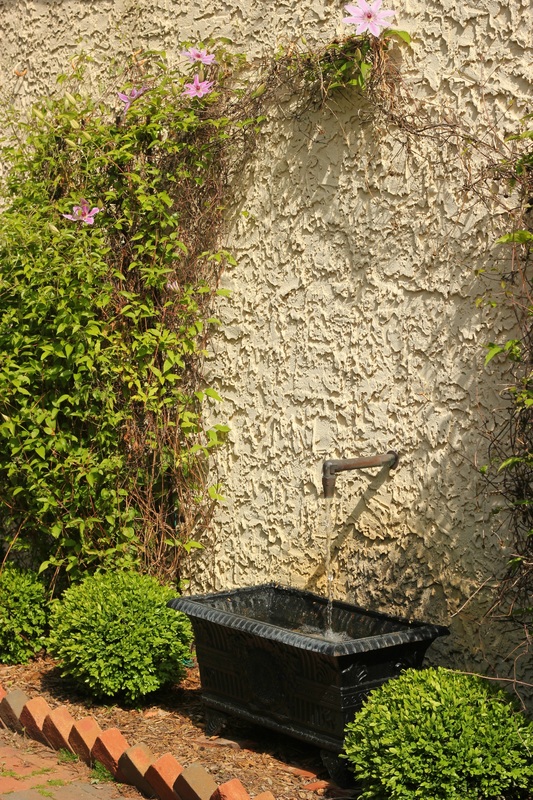 , Our clematis are just starting to bloom. They surround a cast iron, rectangular urn with a bronze water tap that my husband and I assembled for our fountain. One of the best things about summer, for me at least, is hearing the water in the fountain when outdoors... or, through the window of our bedroom at night. I really miss that once we have to close up the patio in the fall. 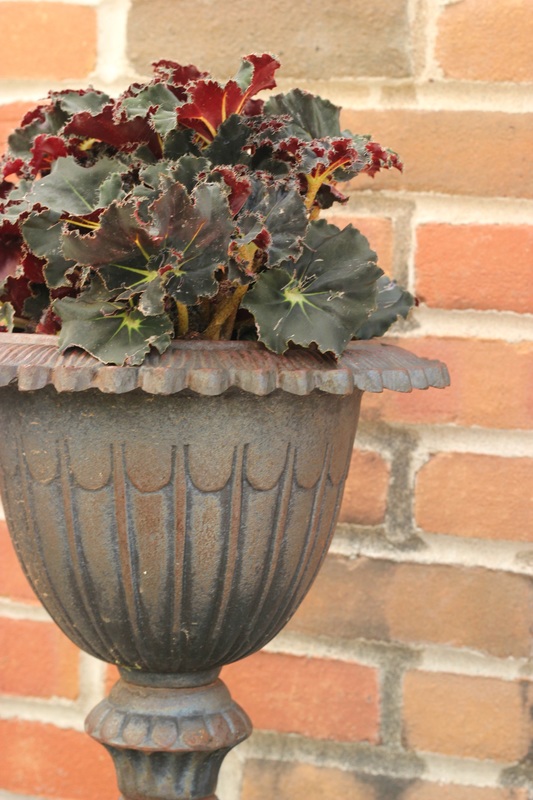 I have a weakness for plants/blooms that lean toward black. Does that have anything to do with the way I dress? If I were starting from scratch, I could see an entire property in black, white (and green, of course), with a deep red-pink thrown in here or there. Last year I had the most beautiful begonia with black leaves and just a touch of that deep red-pink. I loved that plant and lost it when we were traveling late summer . My fault. And I cannot find it anywhere this year... I'll continue to look.  And that brings me to Bisous... he's been growing into a big, healthy, and dare I say, handsome, young man... which hasn't been easy! He has a penchant for eating anything and everything that can be harmful to a dog. And he does so with a lightening speed determination. We take him on many, many walks during the day. He would prefer being out running in the garden with me, rather than watching from inside. But the times he has been loose out back, it resulted in a (costly) call to poison control after he ate entire marigold plants. After that, gazanias. Throw in the occasional stone, or whirly-birds from the maple tree that showers our yard, patio and deck, and it's constant monitoring of what Bisous will try to devour next. I remember a somewhat similar challenge with Pipi, our previous Frenchie, but any dangerous behavior by her now seems almost nonexistent compared to Mr. B. Bisous is now over 6 months and over 19 pounds. A big boy! And of course, still growing. He's a sweetie and VERY, VERY active.  • adapted from Bon Appetit | April 2010 CRUST: • 1 1/4 cups all-purpose flour • 1 tablespoon sugar • 1/4 teaspoon salt • 7 tablespoons chilled unsalted butter, cut into 1/2-inch cubes • 2 tablespoons (or more) ice water TOPPING: • 1 pound trimmed rhubarb, cut into 2-inch-long, 1/4-inch-thick matchstick-size strips • 1/4 cup, plus 2 tablespoons sugar, divided • 2 tablespoons unsalted butter, cut into pieces • 1 large egg yolk • 1 to 2 tablespoons turbinado (raw) sugar • 8-ounce container organic, full-fat sour cream • 2 tablespoons sugar 1. Pulse flour, sugar, and salt in food processor to blend. Add butter and pulse until it resembles large crumbs. Add 2 tablespoons ice water and pulse until dough clumps together, adding more ice water by teaspoonfuls if dough is dry. Gather dough into a ball; flatten into a disk and wrap in plastic; chill at least 2 hours. 2. Meanwhile, combine rhubarb and 1/4 cup sugar in medium bowl; let stand at least 20 minutes and up to 1 hour. Position rack in center of oven and preheat to 350˚F. Place a large sheet of parchment on work surface; sprinkle parchment with flour. Roll out dough on parchment to a 12-inch round. Transfer dough on parchment to a large, rimmed baking sheet. Drain the rhubarb and mound onto the center of the pastry, leaving a 2-inch border at edge. Gently fold dough border up over outer edge of rhubarb topping. folding and crimping dough to create pleats. Sprinkle 2 tablespoons sugar over rhubarb; dot with butter. Brush dough edges with beaten egg yolk. Sprinkle edges with 1 to 2 tablespoons turbinado sugar. 3. Bake the galette until rhubarb is tender and juices are bubbling, about 1 hour. Cool galette at least 30 minutes. 4. Mix the sour cream and 2 tablespoons sugar in a small bowl. Serve the galette warm or at room temperature with the sweetened sour cream. ENJOY! TAKE a LOOK: 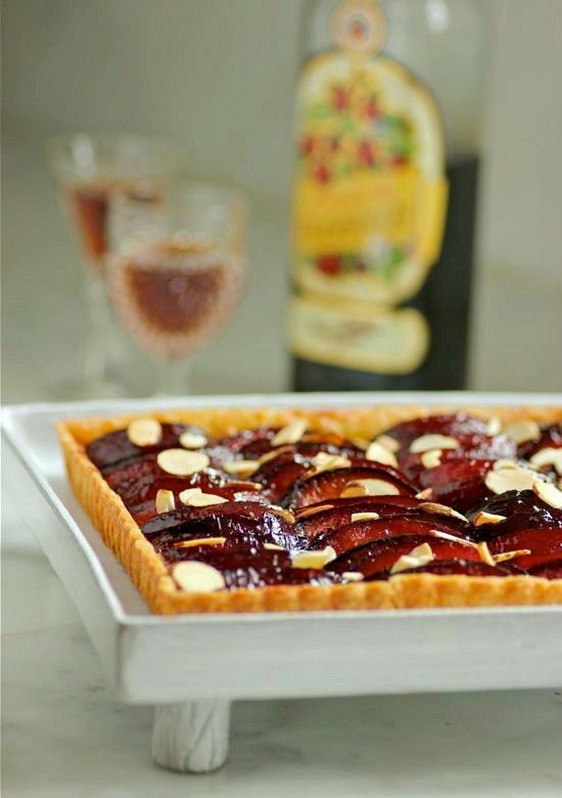 I don't think I've ever purchased plums in April, but I just couldn't wait any longer. I am so very ready to start baking like it's mid-summer! This did the trick. 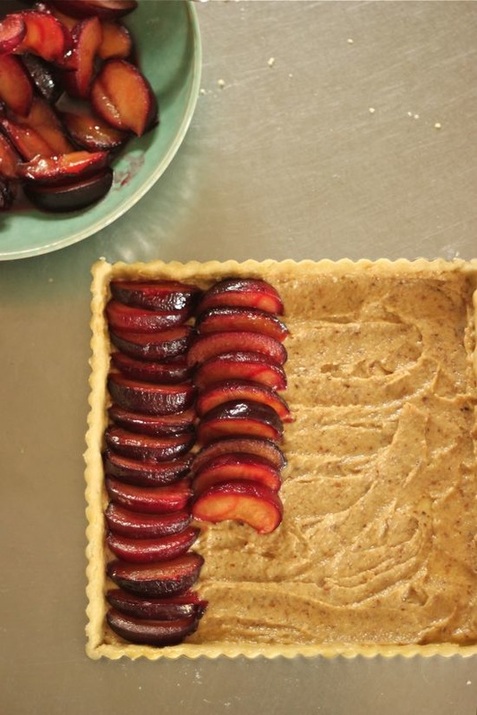 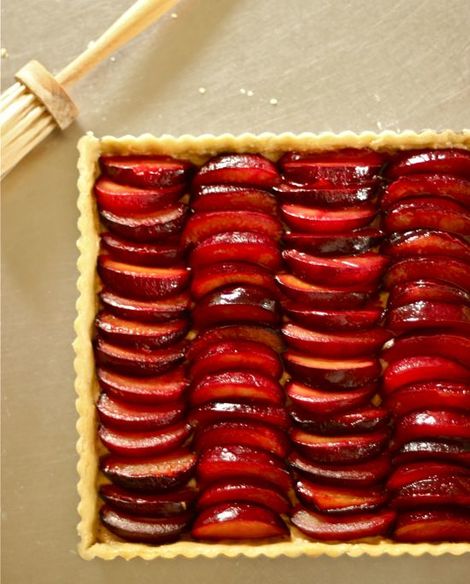 The original recipe calls for a crust of puff pastry, but I substituted a short crust which I usually always do when puff pastry is used as the tart shell.. 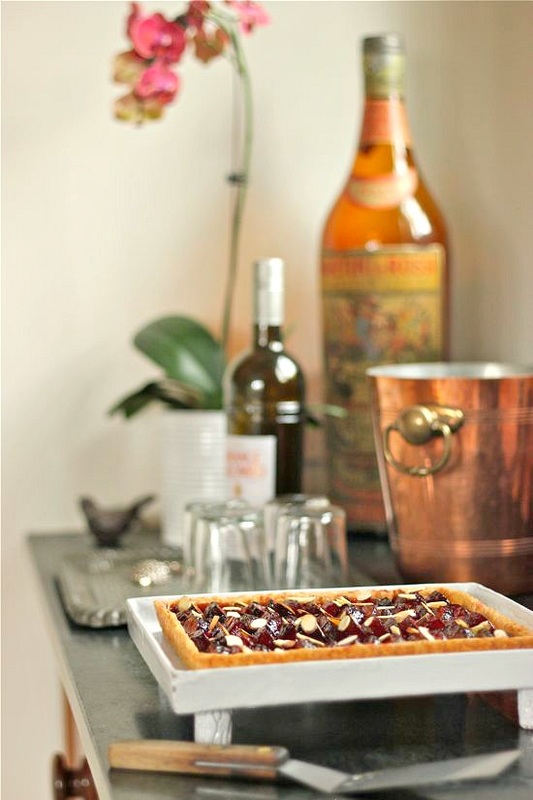 Leftovers were very good with morning cappuccinos!  • adapted from a Food & Wine recipe by Mitchelle Dy... CRUST • 2 cups unbleached, all-purpose flour, plus more for dusting • 1/2 teaspoon sea salt • 10 tablespoons cold unsalted butter, cubed • 1 large egg • Ice water, if needed FILLING • 3 tablespoons unsalted butter, softened • 5 tablespoons packed light brown sugar • 1/4 cup Chambord (I used Crème de Framboise) • 5 ripe plums, halved, pitted, and cut into 1/2-inch wedges • 1/2 cup slivered almonds • 1 1/2 tablespoons unbleached, all-purpose flour • 1 large egg • 1 tablespoon pure vanilla • Toasted sliced almonds for sprinkling, optional To make the crust: 1. Place the flour and salt in the bowl of a food processor. Pulse several times to combine. 2. Toss in the cold butter and pulse until the size of small peas. Add the whole egg and pulse until the dough just begins to come together. If the mixture is too dry to hold together, add ice water little by little until dough is moistened enough to come together. 3. Place flour mixture on a sheet of plastic wrap and press into a disk. Wrap and place in refrigerator for at least an hour. To make the filling: 1. In a large skillet, melt 1 tablespoon butter with 3 tablespoons of the brown sugar over medium heat until ingredients are thoroughly melted and combined, about 1 minute. Add the Chambord or Crème de Framboise and bring to a simmer. Add the plums and cook, occasionally stirring gently until the edges begin to soften, about 2 minutes. Using a slotted spoon, remove the plums to a large shallow bowl to cool. Reserve the juice in the skillet. 2. In a food processor, grind the almonds until very fine. In a medium bowl, combine the remaining 2 tablespoons butter and 2 tablespoons brown sugar. Stir in the ground almonds and the 1 1/2 tablespoons flour. Add the egg and vanilla; stir until fully incorporated. 3. Dust a work surface with flour and roll the pastry to fit a 9-inch square tart pan or any other shape pan you would like to substitute. Fill the tart pan with the pastry and trim edges. Spread the almond mixture over the base of the pastry. Arrange the plums on the almond filling, adding any additional juices to those reserved in the skillet. Chill the tart in the refrigerator while preheating the oven to 375˚ F. 4. Bake the tart on the center rack of the oven for approximately 50 minutes, until the pastry is golden brown. Remove and let cool briefly. Rewarm the Chambord juices and brush the thick liquid over the plums. Sprinkle with toasted almonds. Serve warm or at room temperature. TAKE a LOOK: 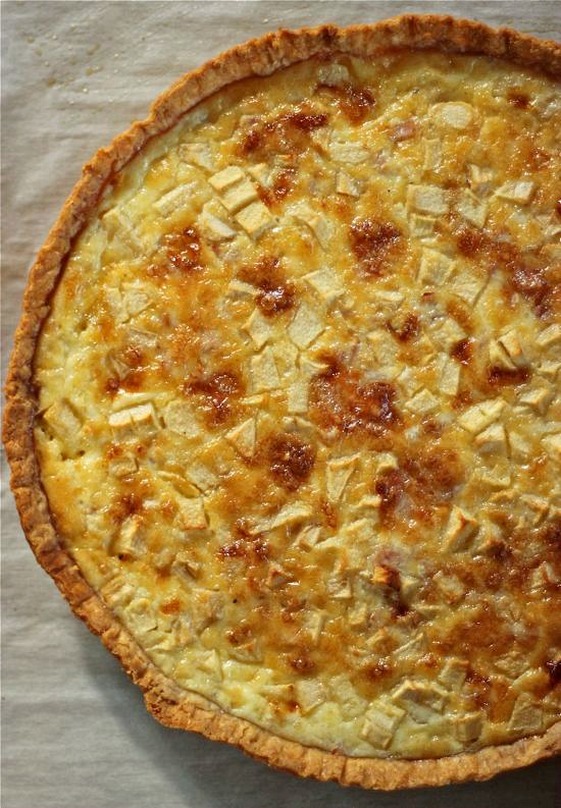 Yesterday evolved into a beautiful, unexpected evening. April has finally given us spring temperatures, and without menacing winds! It would have been easy to avoid the indoors with 70 degree warmth outdoors, but I had a carton of French Époisses in my refrigerator and that trumped any desire to enjoy the sunshine. I opened my kitchen windows and got to work. This tart is an investment. The 8-ounce disk of ripe, stinky cheese sells for $18.00... and I love it! Its taste just screams French -- make no substitutions, The cheese is special enough to plan a dinner around, with neighbors, which is exactly what I did. My husband uncovered the outdoor dining table, brought the chairs out of storage, and uncorked bottles of French wine. The evening ended up being beyond special... hopefully the beginning of a long al fresco season! 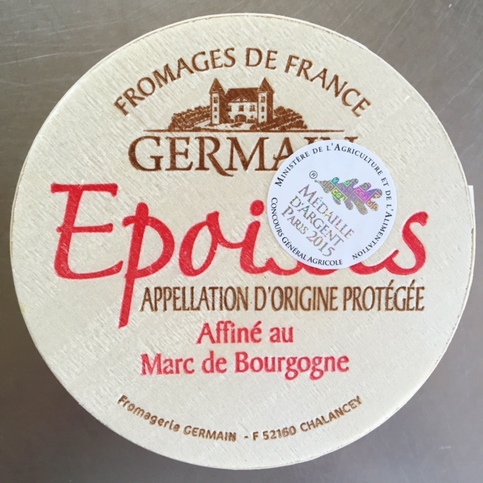 The recipe for this French savory tart is from Ludo Lefebvre of Petit Trois in L.A. I am now wishing we would have made the drive into Los Angeles to dine there when less than an hour out in February... I think at that point I had had it with traffic. I will keep Petit Trois on my "need to do" list. • Époisses, Ham and Apple Tart... FOOD & WINE MAGAZINE PASTRY • 1 3/4 cups all-purpose flour plus more for dusting • 1 1/4 teaspoons kosher salt • 1 stick plus 1 tablespoon (9 tablespoons) cold butter, cubed • 1 large egg yolk • 1/4 cup ice cold water FILLING • One 8-ounce wheel of chilled Époisses, cut into 1/2-inch pieces (with rind) • 1 sweet cooking apple, peeled, cored and cut into 1/2-inch dice • 1/4 pound piece of Parisian-style or boiled ham, cut into 1/3-inch dice • 2 large eggs • 1 1/4 cups heavy cream • 1 teaspoon kosher salt • 1/4 teaspoon freshly ground pepper • Pinch of freshly grated nutmeg 1. Make the Pastry In a food processor, pulse the 1 3/4 cups of all-purpose flour with the kosher salt. Add the cubed butter and pulse until it is the size of small peas. Add the egg yolk and cold water and pulse until the pastry is moistened. Turn the pastry out onto a lightly floured work surface, gather any crumbs and pat into a disk. Wrap the disk in plastic and refrigerate until firm, about 45 minutes. 2. Make the Pastry Preheat the oven to 375°. On a lightly floured surface, roll out the pastry to a 13-inch round. Ease the pastry into an 11-inch fluted tart pan with a removable bottom, pressing it into the corners and up the side. Trim the pastry 1/4 inch above the rim of the tart pan and use the excess to patch any holes or thin parts. Refrigerate the tart shell until chilled, about 15 minutes. 3. Make the Pastry Line the tart shell with parchment paper and fill with pie weights or dried beans. Bake the shell for about 30 minutes, just until dry. Remove the parchment and weights and bake the crust for about 15 minutes longer, until golden. Let cool slightly, then transfer the tart pan to a large baking sheet. 4. Make the Filling Scatter the Époisses, apple and ham evenly in the tart shell. In a bowl, beat the eggs with the heavy cream, salt, white pepper and nutmeg. Pour the custard into the tart shell and bake for about 45 minutes, rotating the sheet halfway through baking, until the custard is just set and lightly browned on top. Transfer the tart to a rack and let cool for 30 minutes. Remove the ring, cut the tart into wedges and serve. MAKE AHEAD The tart can be refrigerated overnight. Let come to room temperature before serving. TAKE a LOOK: 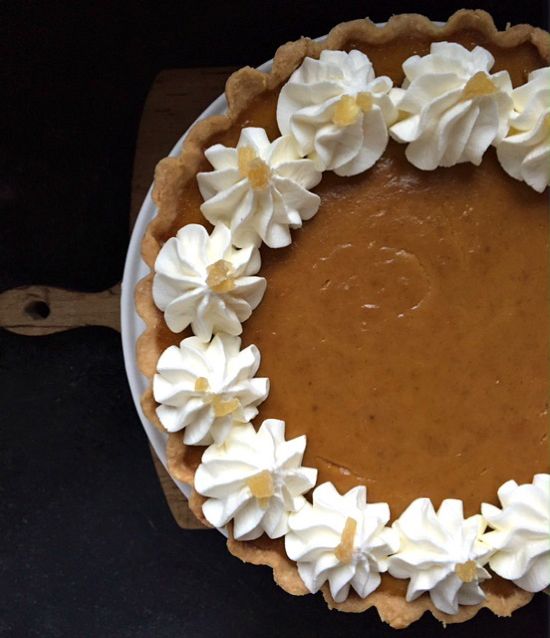 There were seven of us for Thanksgiving dinner. I could have easily gotten by with one pumpkin pie for dessert, but I made two. So glad... This recipe makes the best pumpkin pie I've ever eaten. I've been baking this pie since 1999, when it first appeared in Gourmet magazine. Last year I made one pumpkin pie for seven of us and there were no leftovers. I will NEVER let that happen again. 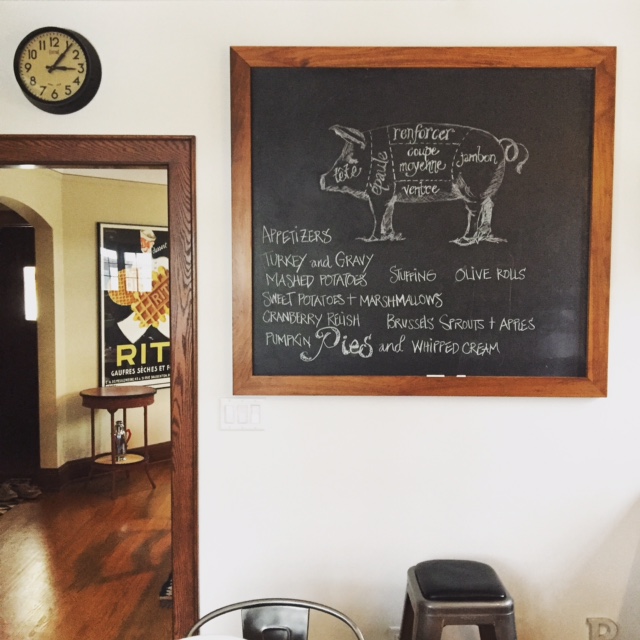 The kitchen above, when it was still somewhat calm. That changed, of course...  • Gourmet, November 1999 PUMPKIN PIE PASTRY DOUGH: • 3/4 stick (6 tablespoons) cold unsalted butter • 1 1/4 cups all-purpose flour • 2 tablespoons cold vegetable shortening • 1/4 teaspoon salt • 2 to 4 tablespoons ice water 1. Cut butter into 1/2-inch cubes 2. Pulse together flour, butter, shortening, and salt in a food processor until most of mixture resembles coarse meal, with the rest in small (roughly pea-size) lumps. Add 2 tablespoons ice water and pulse 2 or 3 times, or just until incorporated. 3. Gently squeeze a small handful; it should hold together without crumbling apart. If it doesn't, add more ice water, 1 tablespoon at a time, pulsing 2 or 3 times after each addition until incorporated (keep testing). (If you overwork mixture or add too much water, pastry will be tough.) 4. Turn out dough onto a work surface and divide into 4 portions. With heel of your hand, smear each portion once in a forward motion to help distribute fat. Gather dough together and form it, rotating it on work surface, into a disk. Chill, wrapped in plastic wrap, until firm, at least 1 hour. + Dough can be chilled up to 1 day. FILLING: • 15-ounce can canned solid-pack pumpkin • 1 cup heavy cream • 1/2 cup whole milk • 2 large eggs • 3/4 cup packed light brown sugar • 1 teaspoon ground cinnamon • 1 teaspoon ground ginger • Pinch of ground cloves • 1/4 teaspoon salt • Whipped heavy cream, for finishing • Finely diced candied ginger, for finishing PREPARATION; 1. Make pastry dough as directed. Roll out dough into a 14-inch round on a lightly floured surface (I always roll my pastry dough between waxed paper and plastic wrap); fit into a 9-inch pie plate. Crimp edge decoratively. Chill 30 minutes 2. PREHEAT OVEN to 375˚F. 3. Line pastry shell with foil and fill with dried beans or rice. Bake in middle of oven for 20 minutes. Remove weights and foil and bake shell until golden, about 10 minutes more. Cool on a rack. Whisk together pumpkin, cream, milk, eggs, brown sugar, spices, and salt; pour into shell. 4. Bake pie in middle of oven, approximately 50 minutes, or until filling is set but center still trembles slightly. (Filling will continue to set as pie cools.) Transfer to rack and cool completely. 5. Serve with whipped and sweetened heavy cream and decorate with candied ginger. + To prevent overbaking custard, you should start checking the pie's doneness at 45 minutes, as ovens vary. TAKE a LOOK: 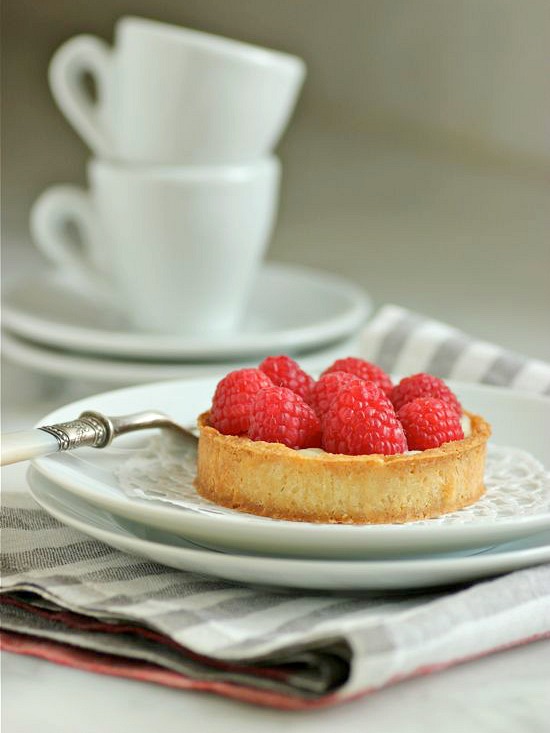 I'm a stickler on presentation. I'm certain that all has to do with my aunt who lived next door while I was growing up. She was a baker and would often call me on the phone announcing she had something to show me right away. I'd immediately run over to her house, where I would find a cake... or a pie... or sweet rolls. The dessert was always beautiful, and we would talk about how lovely it was and how good it will taste. Then... I walked back home. The pastry was for another time; after dinner, or for guests that would be visiting. Never for that immediate moment. That's probably why I am so critical of myself and whatever I make in my kitchen. My family could care less. They just want to eat it, no matter what it looks like. I often describe my desserts as rustic; just never quite achieving that polished French pâtisserie perfection. 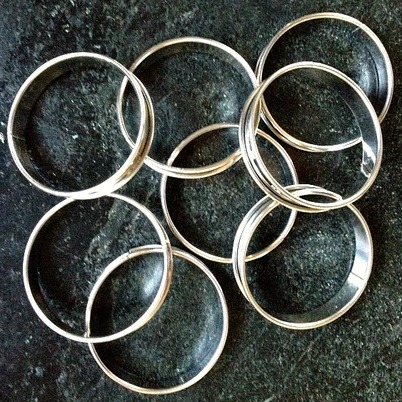 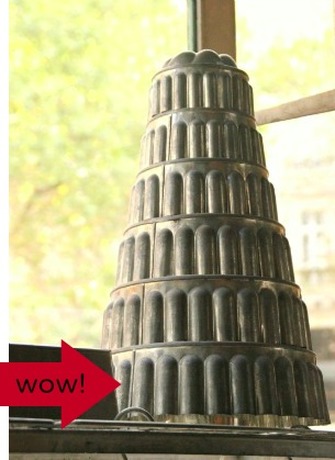 On my recent trip to Paris, I visited my favorite culinary supply store, E. Dehillerin, and took my very patient husband along. (He now knows "my Paris" more than he had ever wanted.) There I picked up some steel rings for making small, individual tart shells. I'm now working at releasing the perfect pastry, finding that a pâte sucrèe pressed into the ring has a better outcome than a tart pastry that is rolled. But pressing fingers too hard against the ring when filling with the pàte sucrèe can also be problematic. I see many long days ahead working on technique. Don't you absolutely love this tower of molds that was in the Dehillerin window? Can you imagine the stunning dessert that would make? My little raspberry tarts with pastry cream were inspired by the raspberry tarts above, that we ate at Le Petit Lux, along with our afternoon espresso. The pâtisserie is on Rue de Vaugirard, the longest road in Paris which extends from the Jardin du Luxembourg to the Porte de Versailles... Wow, that is long!    Ivy garlands at the Jardin du Luxembourg. If I tried to grow something like this in my yard, it would probably end up infested with red spider mites... 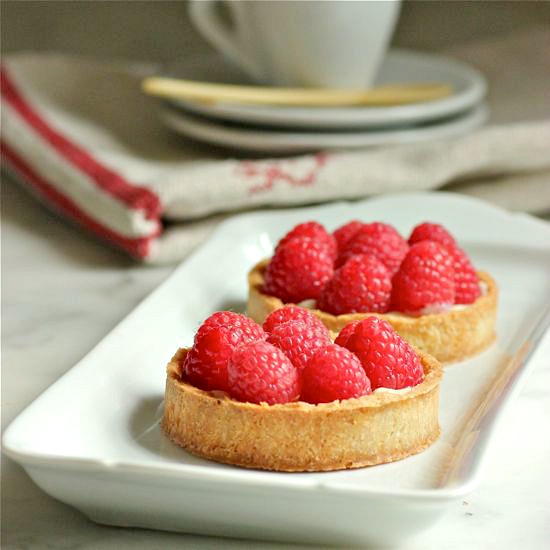 Sprinkle tarts with confectioners' sugar before eating... then, enjoy! 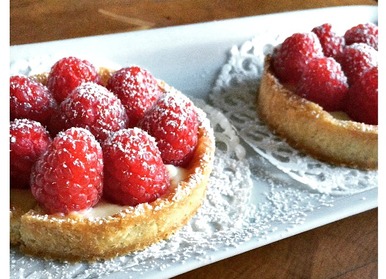
|


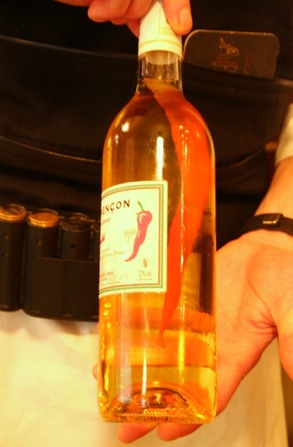 |  |
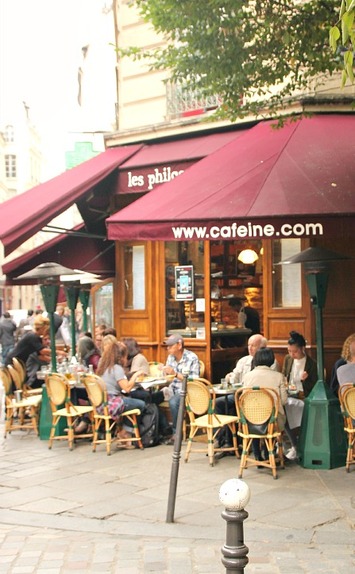
After dinner, we spent the night walking along the right and left banks of the Seine where we saw... a prune festival! I'm thinking... the French take prunes seriously.
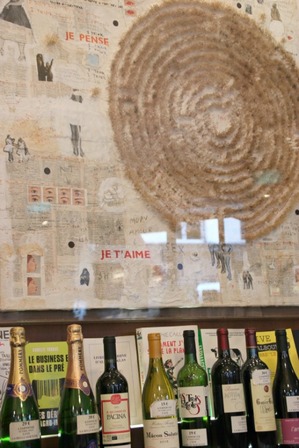
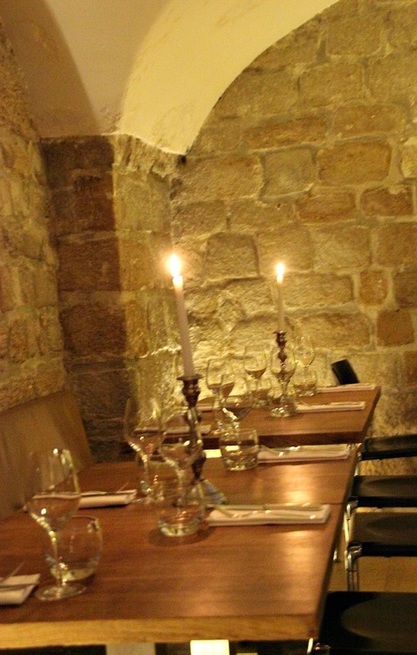
One of several amazing meals we ate in Paris was the next night at SPRING PARIS. It was also one of two restaurants we visited where the chef was an American. Dinner at Spring Paris is a "prix fixe" menu of 4 courses that aren't revealed to the diner until delivered to the table. When we arrived we were asked if we had any allergies. After that, what we were served was a delicious surprise.
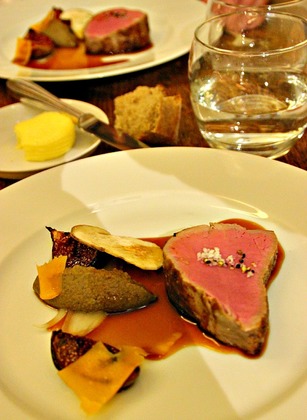
My husband is still raving about the veal filet we ate that night.

The first part of our fourth course, the dessert, was a chocolate wafer with mint gelato.
The second was a prune tart

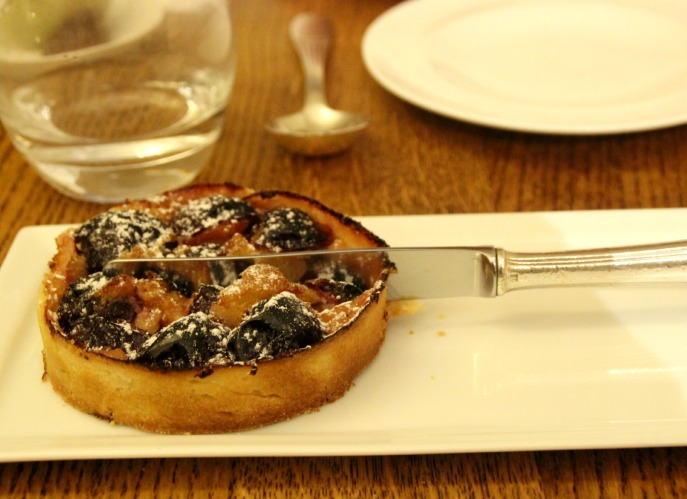
So how could I return home and not make a prune tart? The recipe I used was a Provencal Prune and Almond Tart from Patricia Wells. The dried prunes are plumped in hot black tea before being added to a pastry shell filled with almond cream. It was delicious and I'd have to say, just like the prune tart I ate at Spring Paris.
The other restaurant we both loved and with an American at its helm, was VERJUS. That's for another day and another post...

• 2 cups strong black tea
• 1 pound prunes, pitted
• 1/4 cup whole unblanched almonds
• 1 large egg, slightly beaten
• 5 tablespoons granulated sugar
• 2 tablespoons plum eau-de-vie or brandy
• 3/4 cup heavy cream
• Confectioners' sugar, for garnish
1. At least one hour before preparing the tart, pour the hot tea over the prunes and set aside to marinate.
2. PREHEAT OVEN to 375 degrees.
3. Prepare the cream filling: In the bowl of a food processor, grind the almonds to a fine powder. Thoroughly blend the almonds with the egg, sugar, brandy and cream. The mixture should be very smooth.
4. Thoroughly drain the prunes, discarding the soaking liquid. Carefully arrange the prunes in the cooled, prebaked tart shell. This will seem like a lot of prunes, and you may have to arrange them in two layers. Pour the cream filling over the prunes and place the tart in the center of the oven.
5. Bake until the cream filling has set and the tart shell is nicely browned, about 45 minutes. Remove from the oven and sprinkle with confectioners' sugar.
TAKE a LOOK:


Categories
All
Amana
Appetizers
Beef
Breads
Breakfast
Cakes
Chocolate
Condiments
Cookies
Daring Bakers Challenge
Desserts And Sweets
Drinks
Eggs
Espresso
Etcetera
Fish
French Bulldogs
Friday Night Dinner
Fruit
Germany
Gratins
Great Kitchens
Grilling
Ice Cream
Lamb
Main Dishes
Muffins
My Garden
My Kitchen Renovation
New Years Day Brunch
Paris
Pasta
Pork
Poultry
Provence
Restaurants
Rhubarb
Rice
Salads
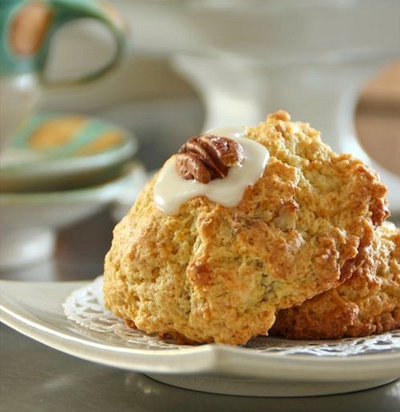
Scones
Seafood
Side Dish
Soup
Sunday Mornings
Sweet And Savory Tarts
Thanksgiving
Tomatoes
Vegetables
Vegetarian
